Getting Started with mump2p CLI
The mump2p CLI is the quickest way to interact with Optimum Network without running your own infrastructure.
In the next 5 minutes, you'll have:
- A working CLI
- Your first published message
- A subscription feeding you live data
The mump2p CLI is your shortcut into Optimum Network — a high-performance, RLNC-enhanced peer-to-peer network.
Instead of:
- Manually locating and connecting to active Optimum Network nodes
- Handling low-level peer discovery and connection logic
- Managing complex network and encoding configurations
The mump2p CLI connects you directly to our hosted optimum-proxy (available in multiple regions) and start sending or receiving messages instantly. It connects to an optimum-proxy and lets you publish and subscribe to real-time topics — with authentication, usage tracking, and advanced delivery options.
Why Optimum Proxy?
Optimum Network is a peer-to-peer network where nodes exchange messages over a RLNC-enhanced pubsub mesh.
If you connect directly to a P2P node, you need to:
- Know node IP/port.
- Handle peer discovery.
- Many more complex configuration operations.
The Optimum Proxies removes that complexity:
- Acts as points of entry.
- Maintains connections to multiple Optimum Network nodes.
- Enforces thresholds and applies filters.
- Tracks usage and applies fair rate limits.
With mump2p, you connect only to the proxy — it does the rest.
Why Authentication?
Authentication in mump2p-cli is not just about logging in, it enables:
- Access Control: Only authorized users can publish/subscribe to protected topics.
- Rate Limits: Prevents spam and ensures fair use.
- Usage Tracking: Monitor your publish/subscription stats.
- Account Linking: Associate activity with your user or team.
How It Fits into the Network
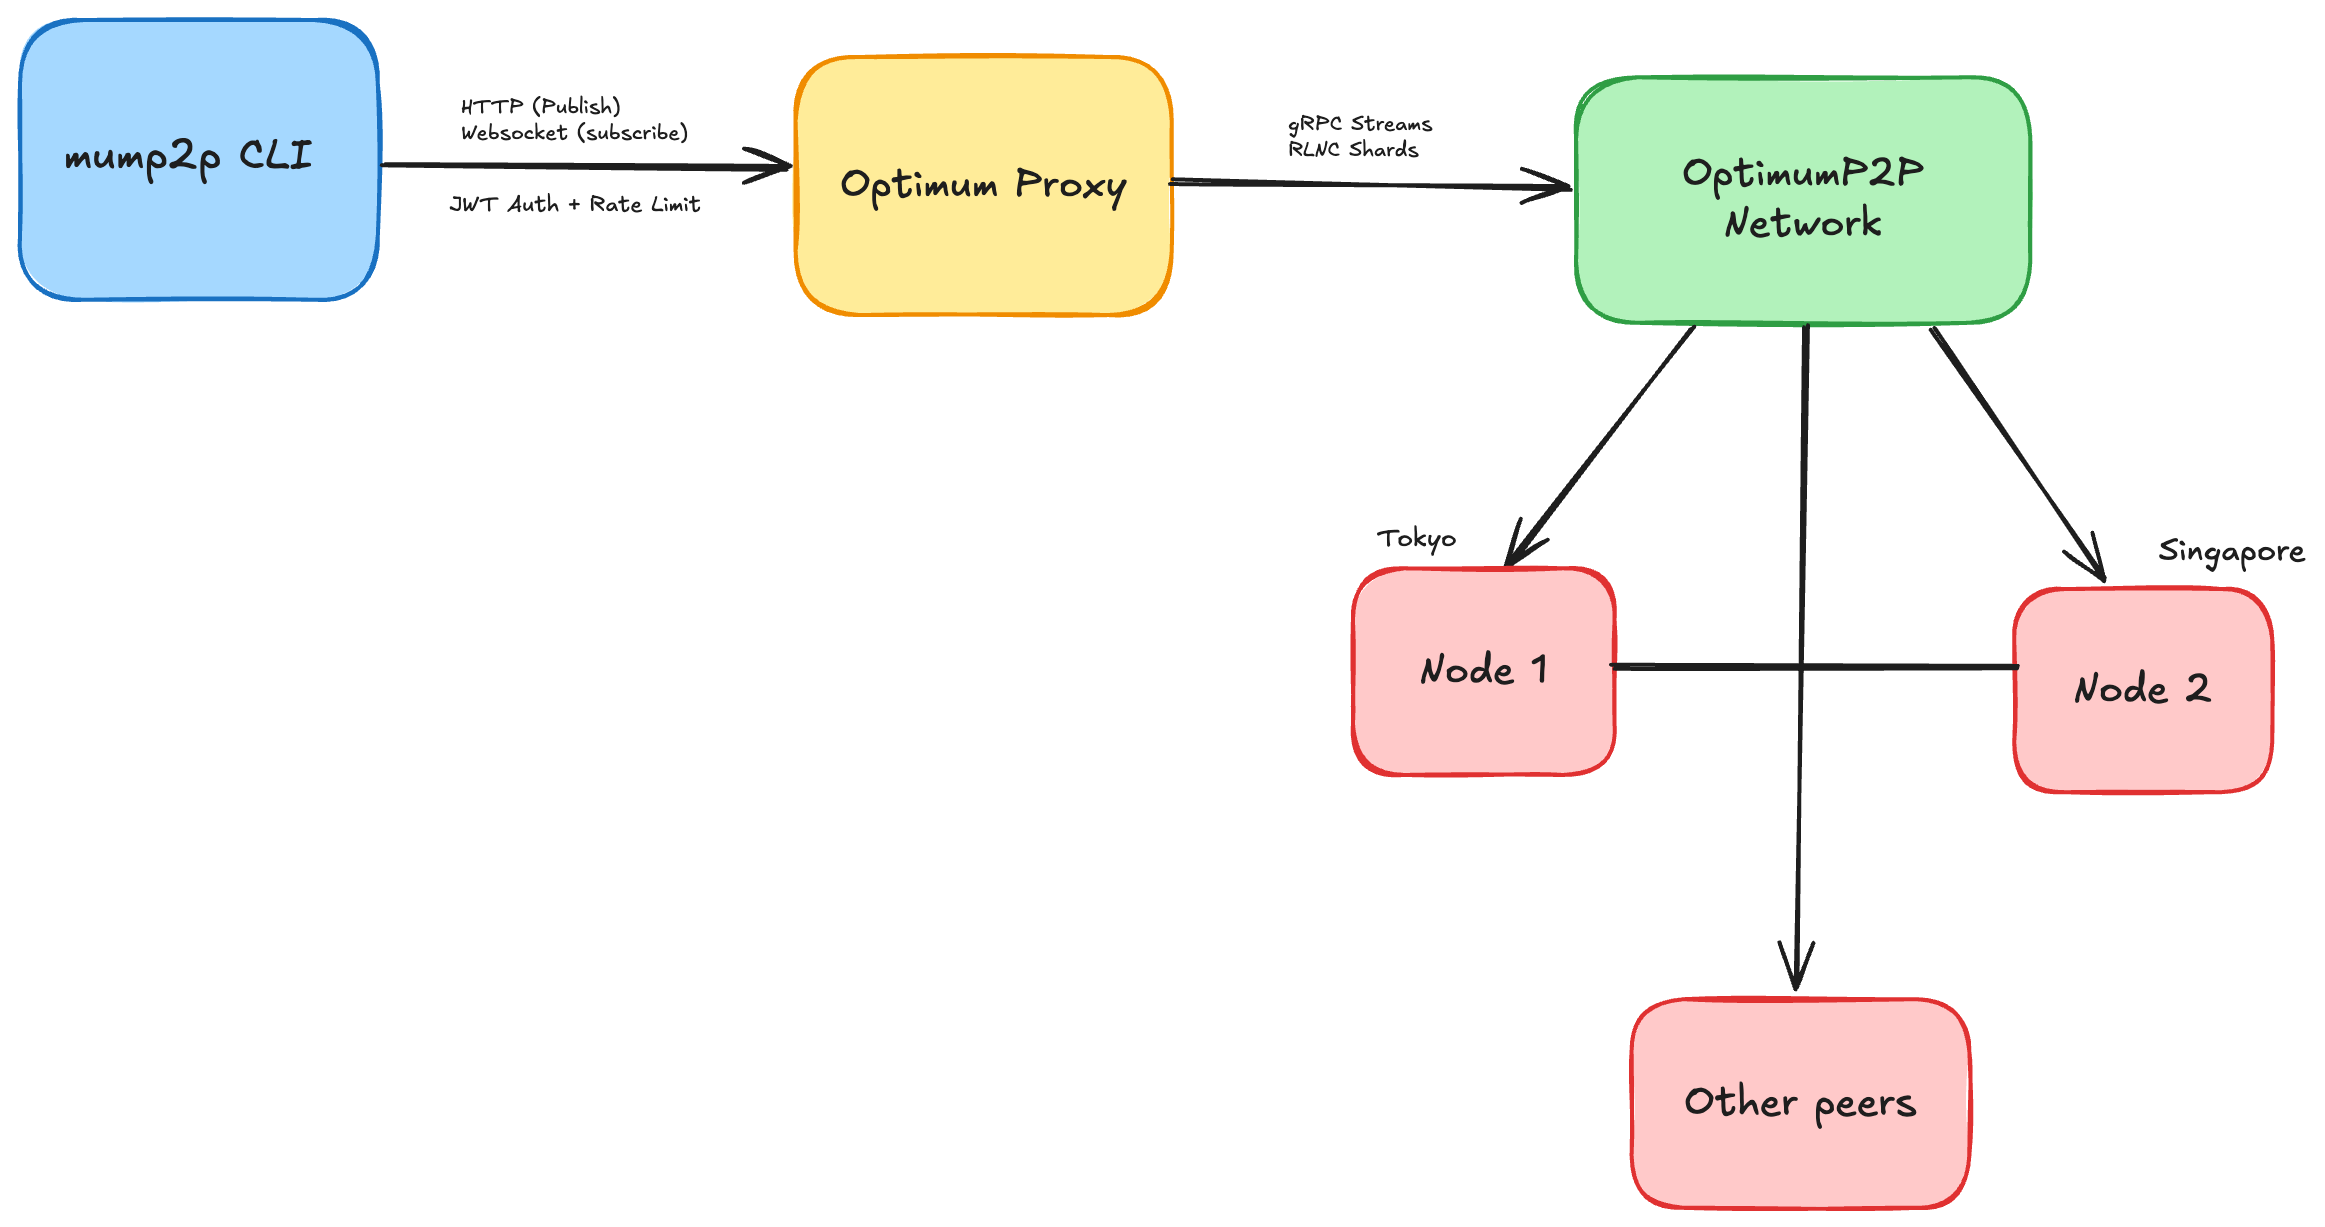
- CLI talks to the Proxy via HTTP/WebSocket or gRPC.
- Proxy connects to the P2P Mesh (multiple nodes across regions).
- Mesh uses RLNC for efficient message delivery and reconstruction.
- Your client receives fully decoded messages in real-time.
1. Install mump2p CLI
Quick Install (One Command)
curl -sSL https://raw.githubusercontent.com/getoptimum/mump2p-cli/main/install.sh | bashThis automatically:
- Detects your OS (Linux/macOS)
- Downloads the latest release
- Sets correct permissions
- Verifies installation works
Manual Install
If you prefer manual installation:
| OS | Command |
|---|---|
| Linux | curl -L -o mump2p https://github.com/getoptimum/mump2p-cli/releases/latest/download/mump2p-linux && chmod +x mump2p |
| macOS | curl -L -o mump2p https://github.com/getoptimum/mump2p-cli/releases/latest/download/mump2p-mac && chmod +x mump2p |
Verify Installation
./mump2p versionAlways use the latest version from mump2p-cli releases
2. Authenticate
Login via device authorization flow:
./mump2p loginOutput:
Initiating authentication...

To complete authentication:
1. Visit: https://your-auth-domain.auth0.com/activate?user_code=XXXX-XXXX
2. Or go to https://your-auth-domain.auth0.com/activate and enter code: XXXX-XXXX
3. This code expires in 15 minutes

Waiting for you to complete authentication in the browser...

✅ Successfully authenticated
Token expires at: 18 Aug 25 13:15 IST- CLI shows a URL and a code.
- Open the URL in your browser.
- Enter the code to complete authentication.
- CLI stores a JWT for future requests.
Check status
./mump2p whoamiOutput:
Authentication Status:
----------------------
Client ID: google-oauth2|100677750055416883405
Expires: 18 Aug 25 13:15 IST
Valid for: 24h0m0s
Is Active:  true

Rate Limits:
------------
Publish Rate:  1000 per hour
Publish Rate:  8 per second
Max Message Size:  4.00 MB
Daily Quota:       5120.00 MB
Important: By default Is Active is false. Contact us to activate your account.
Other auth commands
./mump2p refresh   # Refresh token
./mump2p logout    # Logout
Development Mode (No Authentication)
For testing without authentication:
./mump2p --disable-auth --client-id="test-client" publish --topic=demo --message="Hello" --service-url="http://proxy_1:8081" # localhost
./mump2p --disable-auth --client-id="test-client" subscribe --topic=demo --service-url="http://proxy_1:8081" # localhost
Complete Guide: Development mode documentation - covers all flags, usage, and examples
Custom Authentication Path
For production deployments or custom storage locations:
./mump2p --auth-path /opt/mump2p/auth/token.yml login
# Or use environment variable
export MUMP2P_AUTH_PATH="/opt/mump2p/auth/token.yml"
Complete Guide: Custom auth path documentation - use cases, security, deployment
Refresh Output:
Current token status:
Expires at: 18 Aug 25 13:15 IST
Valid for:  23h56m0s
Refreshing token...
✅ Token refreshed successfully
New expiration: 18 Aug 25 13:19 IST
Valid for:      24h0m0s
Logout Output:
✅ Successfully logged out3. Choose a Proxy Location
Available Service URLs:
| Location | URL |
|---|---|
| Tokyo (Default) | 34.146.222.111:8080 |
| Tokyo | 35.221.118.95:8080 |
| Singapore | 34.142.205.26:8080 |
Use a custom location
--service-url="http://34.142.205.26:8080"4. Subscribe to a Topic
Basic subscription
./mump2p subscribe --topic=demoOutput:
claims is &{google-oauth2|100677750055416883405 2025-08-17 13:15:07 +0530 IST 2025-08-18 13:15:07 +0530 IST true 4194304 1000 8 5368709120 google-oauth2|100677750055416883405 1755416706719}
claims is google-oauth2|100677750055416883405
Sending HTTP POST subscription request...
HTTP POST subscription successful: {"status":"subscribed","topic":"demo"}
Opening WebSocket connection...
Listening for messages on topic 'demo'... Press Ctrl+C to exit
Save messages locally
./mump2p subscribe --topic=demo --persist=/path/to/Output:
Persisting data to: /path/to/messages.log
claims is &{google-oauth2|100677750055416883405 2025-08-17 13:15:07 +0530 IST 2025-08-18 13:15:07 +0530 IST true 4194304 1000 8 5368709120 google-oauth2|100677750055416883405 1755416706719}
claims is google-oauth2|100677750055416883405
Sending HTTP POST subscription request...
HTTP POST subscription successful: {"status":"subscribed","topic":"demo"}
Opening WebSocket connection...
Listening for messages on topic 'demo'... Press Ctrl+C to exit
Persisted message format:
[2025-08-17T13:19:08+05:30] Testing persistence!Forward to webhook
Basic webhook forwarding:
./mump2p subscribe --topic=demo --webhook=https://your-server.com/webhookWebhook with custom schema templates:
# Discord
./mump2p subscribe --topic=alerts --webhook="https://discord.com/api/webhooks/..." --webhook-schema='{"content":"{{.Message}}"}'

# Slack
./mump2p subscribe --topic=notifications --webhook="https://hooks.slack.com/services/..." --webhook-schema='{"text":"{{.Message}}"}'

# Custom JSON with metadata
./mump2p subscribe --topic=logs --webhook="https://your-server.com/webhook" --webhook-schema='{"message":"{{.Message}}","timestamp":"{{.Timestamp}}","topic":"{{.Topic}}"}'
Complete Guide: Webhook formatting documentation - Discord, Slack, Telegram templates, variables, queue options
gRPC Subscription
For high-performance streaming, use gRPC mode:
./mump2p subscribe --topic=demo --grpcOutput:
claims is &{google-oauth2|100677750055416883405 2025-08-21 16:01:29 +0530 IST 2025-08-22 16:01:29 +0530 IST true 4194304 1000 8 5368709120 google-oauth2|100677750055416883405 1755772288994}
claims is google-oauth2|100677750055416883405
Sending HTTP POST subscription request...
HTTP POST subscription successful: {"client":"google-oauth2|100677750055416883405","status":"subscribed"}
Listening for messages on topic 'demo' via gRPC... Press Ctrl+C to exit
5. Publish a Message
Text
./mump2p publish --topic=demo --message="Hello from CLI!"Output:
✅ Published inline message
{"status":"published","topic":"demo"}
File
./mump2p publish --topic=demo --file=/path/to/file.jsonOutput:
✅ Published sample-data.json
{"status":"published","topic":"demo"}
gRPC Publishing
For high-performance publishing, use gRPC mode:
./mump2p publish --topic=demo --message="Hello via gRPC!" --grpcOutput:
✅ Published via gRPC inline messageWith threshold
./mump2p publish --topic=demo --message="High reliability" --threshold=0.96. Check Usage & Limits
./mump2p usageOutput:
  Publish (hour):     0 / 1000
  Publish (second):   0 / 8
  Data Used:          0.0000 MB / 5120.0000 MB
  Next Reset:         18 Aug 25 13:15 IST (24h0m0s from now)
  Last Publish:       07 Aug 25 06:33 -0700
Shows:
- Publish count (per hour/day)
- Quota usage
- Time until reset
- Token expiry
7. List Active Topics
Check which topics you're currently subscribed to:
./mump2p list-topicsComplete Guide: List topics documentation - multi-proxy support, output format
8. Check Proxy Health
Monitor the health and system metrics of the proxy server:
./mump2p healthOutput:
Proxy Health Status:
-------------------
Status:      ok
Memory Used: 7.06%
CPU Used:    0.30%
Disk Used:   44.91%
Check specific proxy
./mump2p health --service-url="http://35.221.118.95:8080"9. Debug Mode
The --debug flag provides detailed timing and proxy information for troubleshooting and performance analysis.
What it shows:
- Message timestamps (send/receive times in nanoseconds)
- Proxy IP addresses (source and destination)
- Message metadata (size, hash, protocol)
- Sequential message numbering
Basic usage:
# Debug publish operations
./mump2p --debug publish --topic=test-topic --message='Hello World'

# Debug subscribe operations
./mump2p --debug subscribe --topic=test-topic

# Debug with gRPC
./mump2p --debug publish --topic=test-topic --message='Hello World' --grpc
./mump2p --debug subscribe --topic=test-topic --grpc
Example output:
Publish:
Publish: sender_info:34.146.222.111, [send_time, size]:[1757606701424811000, 2010] topic:test-topic msg_hash:4bbac12f protocol:HTTPSubscribe:
Recv: [1] receiver_addr:34.146.222.111 [recv_time, size]:[1757606701424811000, 2082] sender_addr:34.146.222.111 [send_time, size]:[1757606700160514000, 2009] topic:test-topic hash:8da69366 protocol:WebSocketUnderstanding the output:
[1]- Message sequence number[send_time, size]- Unix timestamp (nanoseconds) and message sizemsg_hash/hash- First 8 characters of SHA256 hash for tracking- Calculate latency:
recv_time - send_time
Complete Guide: Debug mode documentation - blast testing, load testing, performance analysis
10. Common Issues
Unauthorized
Error: your account is inactive→ Contact admin to activate account.
Rate limit exceeded
Error: per-hour limit reached→ Wait until reset or request higher tier.
Connection refused
Error: HTTP publish failed: dial tcp ...→ Proxy not reachable. Check --service-url.
Topic not assigned
Error: publish error: topic not assigned→ Topic needs to be subscribed to first or doesn't exist.
Missing message or file
Error: either --message or --file must be provided→ Provide either --message or --file parameter.
Conflicting parameters
Error: only one of --message or --file should be used at a time→ Use only one of --message or --file, not both.
Authentication required
Error: authentication required: token has expired, please login again→ Run ./mump2p login to authenticate.
11. Important Tips
- Use descriptive topic names per team.
- Keep
whoamiandusagehandy. - For high-volume topics, increase webhook queue size.
- Start with hosted proxy, then try local deployment for full control.
- Subscribe to a topic before publishing to it.
- Use the
--service-urlflag to connect to different gateways for better performance. - Use
--grpcflag for high-performance streaming and publishing. - Monitor proxy health with
./mump2p healthfor troubleshooting. - Use
--debugflag for performance monitoring and troubleshooting. - Check active topics with
./mump2p list-topicsto manage subscriptions.
Complete Documentation
- Complete User Guide - Advanced features, authentication, webhooks, debug mode
- CLI Repository - Source code and documentation
- FAQ & Troubleshooting - Common issues and solutions
- Latest Releases - Download latest version