Getting Started with Docker (Local Deployment)
Running Optimum Network locally with Docker gives you full control over configuration, topology, and experiments.
You can run the network in two primary ways:
1. OptimumProxy + mump2p — Clients connect to an Optimum Proxy, which manages P2P connections for them.

- Simplifies client configuration — only the Proxy address is needed.
- Proxy handles shard reassembly, threshold logic, and node selection automatically.
- Easier scaling and centralized policy control.
2. Direct mump2p — Clients connect directly to mump2p nodes (each node must run the gRPC API).
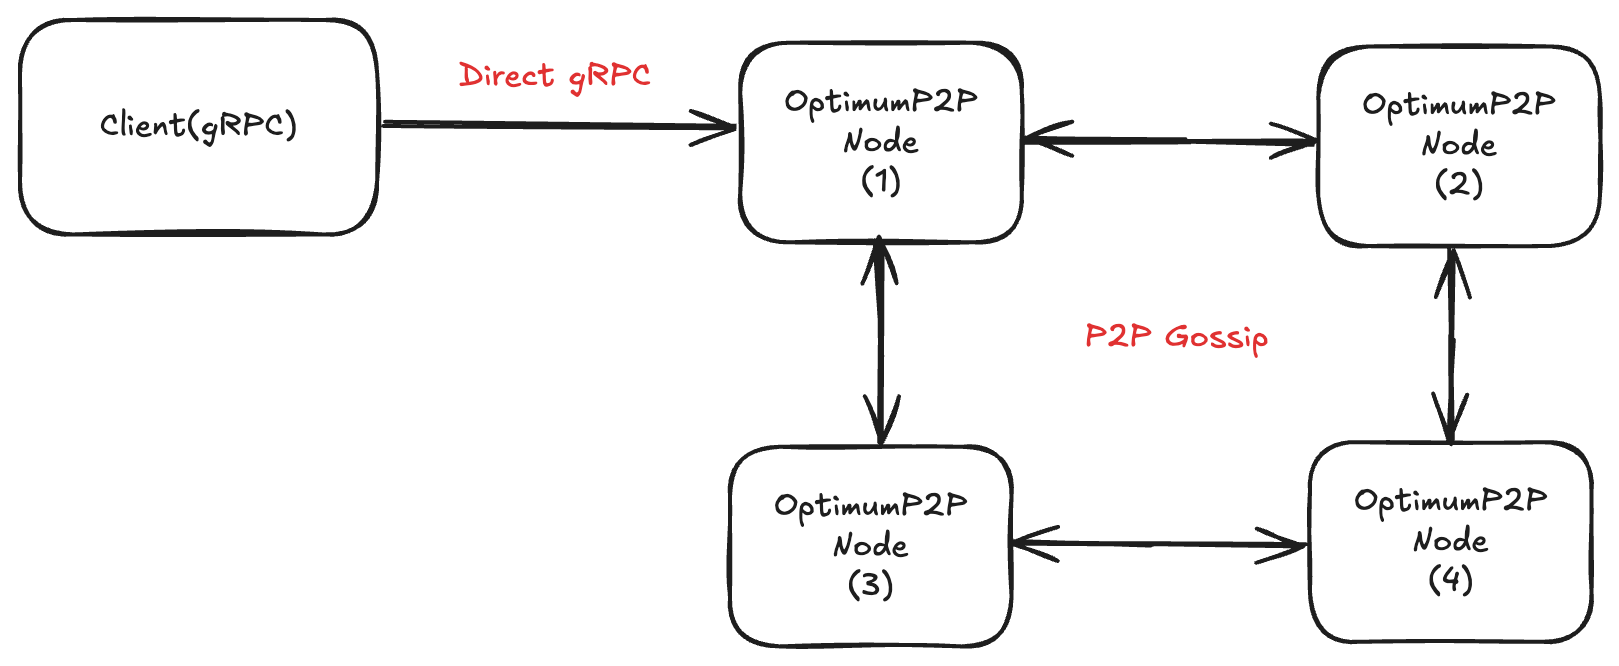
- Fewer network hops = potentially lower latency.
- Clients must know node addresses and manage failover logic.
- Best for specialized or performance-critical workloads.
While the mump2p-cli (Hosted Proxy) lets you get started instantly,
local deployment offers:
- Custom Configuration — Tune thresholds, shard factors, and mesh sizes.
- Full Control — Decide how many nodes, their topology, and resource allocation.
- Private Testing — Run in isolated networks without using public proxies.
- Advanced Experiments — Simulate network conditions, failure scenarios, and scaling.
Which mode should I use?
Choose the deployment mode that best fits your use case:
| Mode A: Proxy + mump2p | Mode B: Direct mump2p |
|---|---|
| One endpoint — simpler client config | Lowest latency — fewer network hops |
| Policy control — rate limiting, auth | Direct control — no proxy overhead |
| Auto failover — proxy handles node selection | Manual failover — clients manage addresses |
Quick Decision:
- Want simpler setup and client code? → Start with Mode A
- Need maximum performance and control? → Jump to Mode B
1. Before You Start
Requirements
- Docker — Container runtime for running Optimum Network components
- Docker Compose — Tool for defining multi-container applications
- Go v1.24+ — Required for building custom gRPC clients
- At least 2 GB free RAM for running multiple nodes locally
Quick Docker Install:
- Linux:
curl -fsSL https://get.docker.com | sh- macOS: Docker Desktop for Mac
- Windows: Docker Desktop for Windows
Components
| Component | Purpose | Docker Images |
|---|---|---|
| mump2p Node | RLNC-enabled mesh peer, encodes/decodes message shards, handles peer discovery and subscriptions. Optional gRPC API for direct clients. | getoptimum/p2pnode:${P2P_NODE_VERSION-latest} |
| Optimum Proxy | Bridges clients and the mesh, manages subscriptions, shard reassembly, threshold logic, and node selection. | getoptimum/proxy:${PROXY_VERSION-latest} |
Directory layout
Create a clean working folder:
mkdir -p ~/optimum-local/{proxy-p2p,direct-p2p,identity}
cd ~/optimum-local
We’ll keep identity in ./identity folder so you can reuse keys across restarts.
2. Pick Your Mode
| Recommended mode | Why |
|---|---|
| OptimumProxy + mump2p | One endpoint for clients, proxy handles matching, decoding thresholds, fanout, and policy |
| Direct mump2p | Fewer hops, you control connection/retry logic and node selection |
3. Environment Configuration
Before starting, create your .env file:
cp .env.example .envImportant: After copying, you need to replace the BOOTSTRAP_PEER_ID in your .env file with the peer ID generated by make generate-identity.
Workflow:
- Run
make generate-identity- this creates a unique peer ID - Copy the generated peer ID from the output
- Edit your
.envfile and replace the exampleBOOTSTRAP_PEER_IDwith your generated one
Edit with your values:
BOOTSTRAP_PEER_ID=<your-generated-peer-id>
CLUSTER_ID=my-cluster
PROXY_VERSION=v0.0.1-rc16
P2P_NODE_VERSION=v0.0.1-rc16
Complete Guide: Environment configuration
4. Generate a Bootstrap Identity
Generate P2P identity for node discovery:
make generate-identityThis creates ./identity/p2p.key with your unique Peer ID.
Complete Guide: Identity generation and Makefile commands - all make commands, direct binary usage
5. Mode A — OptimumProxy + mump2p (Recommended)
Docker Compose Setup
Key points:
- Use
.envvariables for versions and cluster ID - Network uses static IPs for deterministic bootstrap addresses
- Bootstrap node (p2pnode-1) needs identity volume mount
- Production setup uses 2 proxies and 4 P2P nodes
Simplified example:
services:
  proxy-1:
    image: 'getoptimum/proxy:${PROXY_VERSION-latest}'
    environment:
      - CLUSTER_ID=${CLUSTER_ID}
      - P2P_NODES=p2pnode-1:33212,p2pnode-2:33212
    ports:
      - "8081:8080"
      - "50051:50051"

  p2pnode-1:
    image: 'getoptimum/p2pnode:${P2P_NODE_VERSION-latest}'
    volumes:
      - ./identity:/identity
    environment:
      - CLUSTER_ID=${CLUSTER_ID}
      - NODE_MODE=optimum
      - IDENTITY_DIR=/identity
Complete Docker Compose:
Start the Network
export BOOTSTRAP_PEER_ID=<your-peer-id>
docker-compose -f docker-compose-optimum.yml up --build -d
Verify Health
# Check containers
docker-compose -f docker-compose-optimum.yml ps

# Test endpoints
curl http://localhost:8081/api/v1/health  # Proxy
curl http://localhost:9091/api/v1/health  # P2P node
Complete Testing Guide: Health checks and validation
Send & receive (Proxy mode) using mump2p-cli
If you haven't already installed mump2p-cli, see the Getting Started with mump2p-cli chapter.
Subscribe:
./mump2p subscribe --topic=demo --service-url=http://localhost:8081Publish (in a new terminal):
./mump2p publish --topic=demo --message="Hello via Proxy" --service-url=http://localhost:8081You should see your subscriber print the message immediately.
Use Proxy via REST API (Optional)
Basic commands:
# Publish
curl -X POST http://localhost:8081/api/v1/publish \
  -H "Content-Type: application/json" \
  -d '{"client_id":"test","topic":"demo","message":"Hello"}'

# Subscribe
curl -X POST http://localhost:8081/api/v1/subscribe \
  -H "Content-Type: application/json" \
  -d '{"client_id":"test","topic":"demo","threshold":0.1}'

# WebSocket
wscat -c "ws://localhost:8081/api/v1/ws?client_id=test"
Complete API Reference: Proxy REST and WebSocket API - parameters, rate limits, authentication
Use Proxy via gRPC (Optional)
For gRPC bidirectional streaming (higher performance than WebSocket):
Complete Implementation:
- Proxy gRPC Client Source
- Setup and Usage Guide
- REST subscription + gRPC streaming + flow control settings
6. Mode B — Direct mump2p (Advanced / Lower Latency)
In this mode, clients connect directly to node sidecar gRPC (no proxy).
Docker Compose Setup
Simplified example:
services:
  p2pnode-1:
    image: 'getoptimum/p2pnode:${P2P_NODE_VERSION-latest}'
    volumes:
      - ./identity:/identity
    environment:
      - CLUSTER_ID=${CLUSTER_ID}
      - NODE_MODE=optimum
      - IDENTITY_DIR=/identity
    ports:
      - "33221:33212"
Complete Docker Compose: Full configuration for direct P2P mode
Note: The docker-compose file uses environment variables from
.envfor versions. Ensure your.envfile hasPROXY_VERSIONandP2P_NODE_VERSIONset.
Start and Verify
export BOOTSTRAP_PEER_ID=<your-peer-id>
docker-compose -f docker-compose-optimum.yml up --build -d
curl http://localhost:9091/api/v1/health
Use P2P Client Directly
Connect using the P2P client with trace handling and metrics:
# Subscribe
./grpc_p2p_client/p2p-client -mode=subscribe -topic=testtopic --addr=127.0.0.1:33221

# Publish
./grpc_p2p_client/p2p-client -mode=publish -topic=testtopic -msg="Hello" --addr=127.0.0.1:33222
Complete Implementation:
For all configuration variables, see the Parameters Section.
Troubleshooting
"Connection refused" from client
- Ensure you're pointing to the host-mapped ports (e.g., 33221, 8081).
- Run
docker-compose -f docker-compose-optimum.yml psand confirm port bindings. - Firewalls: allow inbound localhost traffic.
Proxy can’t reach nodes
- Inside the proxy container, resolve and ping node hosts:
docker-compose -f docker-compose-optimum.yml exec proxy-1 sh -lc 'nc -zv p2pnode-1 33212'- Make sure
P2P_NODEShostnames match theservice namesin compose.
Port conflicts
- Change host mappings in ports: (e.g., 33223:33212, 9093:9090, 7073:7070).
Protocol mismatch
- All nodes in a mesh must use the same NODE_MODE (optimum or gossipsub).
Stop and Clean
Stop:
docker-compose -f docker-compose-optimum.yml downFull reset (containers, volumes, images created by this compose file):
docker-compose -f docker-compose-optimum.yml down -v --rmi local